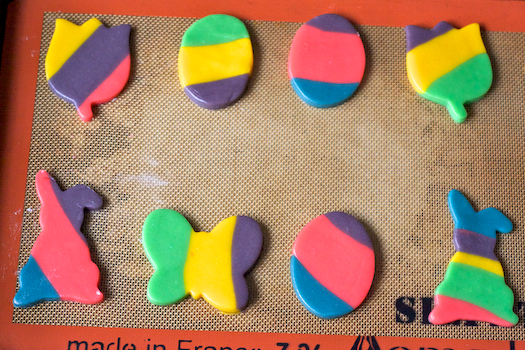
Note: This recipe originally appeared as a guest post on the lovely Eat Boutique. While the cookies below have an Easter theme these rainbow cookies can easily be adapted to fit any occasion. Think purple, orange, and black for Halloween or red, white, and green for Christmas.
Are you good at decorating sugar cookies? Because I’m not. Not even a little bit. I do love to eat them though so I’ve probably consumed many dozen very badly personally iced shapes in my lifetime. At this point I’ve honestly stopped trying and you have to count yourself lucky if your treat gets a layer of single-colored icing.

If you’ve played Draw Something with me then you’re very familiar with the fact that I don’t have an artistic bone in my body. What? Draw a house? You can’t tell that that’s a house? That off-center rectangle right there is a chimney! Duh. Needless to say if I can’t sketch simple shapes on an iPad than wielding a pastry bag full of precious pink icing isn’t going to be a pretty sight either.

So I like to think up clever ways to make pretty things that I don’t have to ruin with frosting. Like these thick and chewy sugar cookies. I think they’re rather stunning and dyeing the dough, rolling it out in rainbow strips, and then cutting out cute Easter appropriate shapes didn’t make me want to cry or have a single kitchen fit. For a little added flair, since making the cookies was such a breeze, I even packaged them in pretty self-standing bags and accessorized with seasonal ribbon. Who needs frosting? Not me! Want to make these simple treats at home? Let me walk you through the process.
Thick and Chewy Rainbow Cookies
Cookie recipe originally published on the Food Network website. Decoration inspired by Betty Crocker.com.
1 cup butter, unsalted
1 cup white sugar
2 eggs, lightly beaten
1 teaspoon vanilla
3 cups flour
2 teaspoons baking powder
1 teaspoon salt
In a bowl, cream the butter and sugar. Beat in the eggs and vanilla.
In a second bowl, combine and mix well the flour, baking powder, and salt. Then stir the flour into the butter mixture 1 cup at a time.
Using a 1-cup measuring scoop divide the prepared dough equally into 5 parts. If too little or too much dough remains as you create the fifth dough ball make adjustments accordingly.
Dying the Dough
There will be less cleanup necessary in-between dyeing the dough if you follow this color sequence: begin with red, then purple, followed by blue, green, and end with yellow. Be sure to thoroughly wipe out the mixing bowl before you create the yellow dough or you might end up with streaks.
To begin, place one ball of dough into the bowl of your mixer. Add 8-10 drops of red food coloring (this is entirely subjective and really depends on how dark or light you would like the end color to be). Turn on your mixer and allow the dough to process until the color is equally distributed and no longer streaky. Remove the dough when you are satisfied with the color and proceed with the next color described in the above sequence. For tips on creating colors with food coloring click here.
When all of your dough balls have been dyed place them in a bowl (or on a platter) in the freezer for 20-30 minutes.
Shaping the Dough
Place a rack into the middle position and then preheat the oven to 350 degrees.
Lightly flour a surface. Then slice each dough ball in half. Roll one half of each ball into a rope approximately 3/4-inch wide and 9-inches in length. Place the ropes of dough side-by-side and then gently roll the dough out until it is slightly thicker than 1/4 inch. If your dough seams are loose gently press them together with your fingers and them smooth out any indentation with the rolling pin.

Cut out the dough with the cookie cutters of your choice being sure to angle the cutters so that at least 3 colors are included on the cookie. Place the cookies at least 2 inches apart on a greased or silpat covered cookie sheet. Bake for 10 minutes. The bottoms of the cookies should only be very lightly browned. Allow the cookies to cool for 2 minutes on the baking sheet and them place them on a wire rack to rest.
Using a knife, carefully separate the remaining rolled out dough back into 5 color-coded piles. Re-shape the dough into smaller logs, place them side-by-side on your floured surface and repeat the steps above until you have used as much of your rainbow colored dough as possible. Then begin the process again with your remaining original dough halves. Note: Each time you re-shape your dough the space in between sections will shrink and more colors will show on your cookies.
If you so desire, this tutorial will walk you through how-to create self-standing treat bags. In addition, all of the Easter themed ribbon I purchased was found online at Etsy.


